Author: Lara Hall

Metal Stairs Railings Installation Process: A Step-by-Step Guide for Homeowners

metal works

Metal Stairs Railings provide safety, durability, and visual appeal for both interior and exterior staircases. Whether installed as part of a new construction project or added during a home renovation, properly installed metal railings improve accessibility while enhancing the overall appearance of the property. Although the finished product may appear simple, every successful installation requires careful planning, accurate measurements, quality fabrication, and precise assembly.

Understanding the metal stairs railings installation process helps homeowners know what to expect before work begins and why professional installation plays an important role in long-term performance. A well-installed railing system delivers dependable support while complementing the home’s architectural style.

Why Is Planning Important Before Installation?

Every successful metal stair railing installation begins with careful planning and accurate measurements. Before fabrication starts, the staircase must be evaluated to determine its dimensions, layout, angle, and structural condition. These measurements allow the railing system to be designed specifically for the staircase rather than relying on standard sizes that may not fit properly. Careful planning also helps determine where posts, handrails, and mounting brackets will be positioned. Accurate preparation reduces installation challenges later in the project.

Planning also includes selecting the appropriate railing style, material, and finish. Homeowners may choose from steel, wrought iron, aluminum, stainless steel, or combinations of metal with wood or glass accents depending on the desired appearance. The design should complement the home’s architecture while providing the required level of safety and functionality. During this stage, installers also evaluate building code requirements that influence railing height, spacing, and structural support. Thorough planning creates the foundation for a successful installation.

How Are Metal Stair Railings Fabricated?

Once measurements have been finalized, the fabrication process begins. Skilled fabricators cut, bend, weld, and assemble the various metal components according to the approved design. Advanced equipment such as laser cutters, press brakes, and precision welding systems helps ensure each part matches the required specifications. Every component is carefully prepared before final assembly begins. Precision fabrication allows the railing system to fit accurately during installation.

After fabrication, the railing components usually receive their protective finish. Powder coating, painting, galvanizing, or polishing helps improve durability while protecting the metal from corrosion, scratches, and everyday wear. Decorative details and custom finishes are completed before delivery whenever possible. Thorough quality inspections help verify that every component meets design and structural requirements. Careful fabrication contributes to both appearance and long-term reliability.

What Happens During the Installation Process?

Installation begins by preparing the staircase and confirming that all fabricated components match the site measurements. The installation team identifies the exact locations where support posts, mounting plates, and brackets will be secured. Any necessary adjustments are made before permanent fasteners are installed. Establishing accurate reference points helps maintain proper alignment throughout the project. Precision at this stage improves the quality of the finished installation.

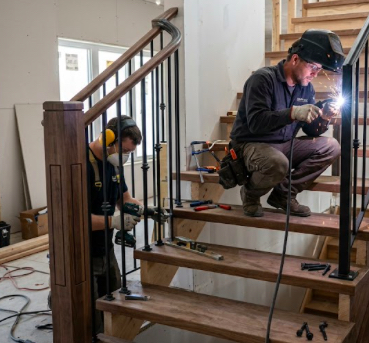
Support posts are typically installed first because they provide the structural foundation for the railing system. Once the posts are securely anchored, handrails, balusters, decorative panels, or other components are carefully attached according to the design. Installers continuously verify spacing, alignment, and stability while assembling the railing. Every connection is tightened and inspected before moving to the next section. Careful assembly ensures the railing performs safely under everyday use.

How Is Safety Verified During Installation?

Safety is one of the highest priorities throughout the metal stairs railings installation process. Every component must be securely fastened to provide reliable support for people using the staircase. Installers carefully check post stability, handrail strength, and overall structural integrity before considering the project complete. Proper installation helps reduce movement, vibration, and potential safety hazards. Reliable construction provides homeowners with confidence in the finished railing system.

Building codes also play an important role during installation. Requirements for handrail height, guardrail spacing, and load resistance help ensure the railing meets accepted safety standards. Installers verify that the completed system complies with applicable requirements while maintaining the intended appearance of the design. Attention to these details contributes to both safety and long-term performance. Proper code compliance protects homeowners as well as future occupants.

What Finishing Steps Complete the Installation?

After all railing components have been installed, the final finishing stage begins. Installers inspect the railing system for alignment, secure connections, and any cosmetic imperfections that may require attention. Protective covers may be removed, exposed hardware checked, and any remaining adjustments completed. This careful review ensures the railing meets both functional and visual expectations. Small refinements improve the overall quality of the finished project.

The surrounding work area is also cleaned before the project is considered complete. Metal shavings, packaging materials, dust, and installation debris are removed to leave the staircase clean and ready for use. Homeowners may also receive guidance regarding proper cleaning methods and long-term maintenance recommendations for the selected finish. Routine care helps preserve both the appearance and structural performance of the railing system. A thorough finishing process completes the installation professionally.

How Should Homeowners Maintain Metal Stair Railings?

Routine maintenance helps preserve the appearance and durability of metal stair railings after installation. Regular cleaning removes dust, dirt, fingerprints, and environmental debris that may accumulate on the surface over time. Mild cleaning products and soft cloths are generally sufficient for maintaining most powder-coated or painted finishes. Consistent cleaning keeps the railing looking attractive while preventing unnecessary buildup. Simple maintenance contributes to long-term performance.

Periodic inspections are equally important for identifying loose fasteners, damaged finishes, or early signs of corrosion. Addressing small concerns promptly helps prevent more significant repairs in the future. Outdoor railings may benefit from occasional touch-up coatings if protective finishes become scratched or worn. Well-maintained railings continue providing dependable safety and visual appeal for many years. Preventive maintenance protects the original investment.

Why Is Professional Installation Worth Considering?

Although some homeowners may consider installing metal stair railings themselves, professional installation offers several important advantages. Experienced installers have the knowledge, tools, and technical skills needed to ensure accurate measurements, secure mounting, and proper alignment throughout the project. Their experience also helps avoid common installation errors that could affect safety or appearance. Professional workmanship contributes to a stronger and more dependable finished product. Precision installation supports long-term durability.

Professional installation also helps simplify the overall project by coordinating fabrication, transportation, assembly, and final inspection. Installers understand how to address unexpected site conditions while maintaining the integrity of the design. Their attention to detail often results in a cleaner appearance and better long-term performance than many do-it-yourself installations. Choosing professional installation provides confidence that the railing system has been installed correctly. Quality craftsmanship helps maximize the value of the investment.

How Do Metal Stair Railings Add Long-Term Value?

Professionally installed metal stair railings provide benefits that extend well beyond safety. Attractive railing systems enhance the architectural appearance of both interior and exterior spaces while creating a polished first impression for visitors and potential buyers. High-quality metal fabrication also reduces maintenance needs compared to many other railing materials. Durable construction allows the system to retain its appearance and functionality for many years. Long-lasting improvements contribute positively to overall property value.

In addition to their visual appeal, metal railings provide dependable structural support that improves everyday usability throughout the home. Their durability, low maintenance requirements, and timeless appearance make them attractive features for future buyers. Investing in quality materials and professional installation helps ensure the railing system continues delivering reliable performance throughout its lifespan. Well-crafted metal stair railings remain valuable additions to residential properties for decades.

Final Thoughts

Understanding the metal stairs railings installation process helps homeowners appreciate the planning, fabrication, precision, and craftsmanship required to produce a safe and attractive finished product. From accurate measurements and custom fabrication to secure installation and final inspection, every stage contributes to the railing system’s durability and long-term performance. Proper installation not only enhances staircase safety but also improves the overall appearance and value of the home. Investing in quality materials, careful planning, and professional installation ensures metal stair railings remain dependable and visually appealing for many years.


What to Expect During a Professional Roof Inspection

Cedar Park Roof Repair

Cedar Park Roof Repair prevent minor issues from escalating into costly repairs down the road. Roofing inspectors perform visual assessments and closely examine your home’s structure, gutter system, soffits, fascia, and chimney for signs of damage.

They also look for shingle wear, and examine the metal flashing around chimneys and other roof penetrations to ensure they’re watertight.

The Inspection Process

Professional roof inspections are essential for preventing minor roofing concerns from escalating into significant and costly repairs. This is accomplished by a thorough assessment that goes far beyond a cursory glance at your shingles. A qualified and experienced roofing contractor will use a combination of visual inspection techniques, industry-leading technologies, and specialized tools to identify potential issues that would otherwise go undetected by an untrained eye.

Roofers will start with an exterior check of your gutter system, soffits, and fascia to assess for water damage, rot, or insect infestation. They will also look for signs of sagging and uneven areas of your roof as well as shingle damage, including curling or loss. In addition, they will inspect your chimney and attic ventilation to ensure adequate airflow and moisture control.

The next step is to move indoors and conduct a more detailed inspection of your attic space. This includes a close examination of the rafters, insulation, and attic vents for any signs of leaks or water penetration. If any problems are identified, the inspector will note them in their report and recommend a course of action for repair.

Throughout this phase, the contractor will be on the lookout for signs of water damage in the interior of your home as well. This includes damp spots on the ceilings and walls, as well as stains in the attic or on the walls. Leaks are one of the most common causes of indoor water damage, so it’s important that they’re identified and repaired quickly.

Finally, the contractor will evaluate the condition of your roof decking to determine its strength and overall structural integrity. They will look for any sagging, warping, or other signs of wear and tear. In addition, they will look for any exposed or rusted nails that could potentially compromise the seal of your shingles. They will also examine skylights to make sure they are sealed correctly and that their flashing is properly secured.

Depending on the condition of your roof and its accessibility, your inspector may also incorporate a technology like thermal imaging or drone capabilities into their assessment. These methods tend to be more costly than a standard inspection, but they can be useful in identifying certain issues that aren’t as obvious from ground level.

Roofing Materials

Whether the roof is made of asphalt shingles, clay tiles, slate, wood, or another material, the roofing professional needs to examine it closely for signs of damage or wear. This includes checking the roof’s surface materials, as well as any flashing or venting that is attached to the roof. In addition, the inspector will look for things like granule loss (small particles that are worn off of asphalt shingles) and the presence of water in areas where it shouldn’t be, such as in valleys or on the eaves.

Roof leaks and other problems can be expensive. By catching them early, a homeowner can save money on repair costs or even avoid the need for a roof replacement.

For homebuyers or sellers, regular roof inspections are an excellent way to identify potential issues and negotiate a lower sale price for a property. A reputable roofing contractor or inspector can provide a detailed report of the roof’s condition, including recommended repairs and maintenance, enabling homeowners to plan for needed work in advance.

An additional part of a roof inspection is looking at the gutter system, downspouts, and ventilation systems to make sure they are working correctly and not causing problems with the roof. Inspecting gutters for clogs, staining, or other damage and making sure they are directing water away from the foundation of the house is critical to extending the life of the roof.

The roof inspection should also include a careful examination of the roof structure itself, particularly any visible supports and structural members. The inspector will check for things like sagging, which is often caused by a damaged roof and can lead to leaks or other problems. In addition, he or she will check the integrity of the roof’s flashing and sealant to ensure they are in good condition.

Finally, a roofing inspection should also include examining the interior of the home for any signs of moisture or water damage that may indicate a problem with the roof. By doing this, the inspector can help the homeowner find the source of the problem and recommend the most effective repairs or solutions.

Gutters and Downspouts

Gutters and downspouts are two of the most frequently overlooked exterior components on a home, but they’re also some of the most important. These systems effectively capture roof runoff and direct it away from the foundation, preventing water damage to the structure and its surrounding areas.

Gutter systems are made up of sections that run along the roof eave line and catch rainwater as it falls, channeling it through downspouts to open ground or drainage lines. They can be customized with various accessories like decorative hoods, ground spouts, splash blocks, and more to fit your property layout and budget.

When it comes to gutters and downspouts, it’s always best to be as informed as possible. If you’re working with an unfamiliar contractor, for example, it may be beneficial to clarify whether you’ll need them to take down the entire gutter system or just the downspouts. This ensures that you’re not getting charged for services that aren’t needed or paying to repair an issue that could have been prevented if the original contractor had clarified the details of their work.

Professional roof inspectors are well-versed in all aspects of roofing and can identify potential problems or damages that might not be immediately apparent to the untrained eye. This makes them an invaluable asset for homeowners, preventing small issues from escalating into costly repairs down the road.

In addition to identifying the condition of your roof, a qualified roof inspector can provide you with helpful tips for improving and maintaining your gutters and downspouts. For instance, they can recommend a first flush diverter to help remove debris from the initial flow of rainwater, which will reduce the need for regular cleaning and prevent the buildup of harmful materials.

A good gutter and downspout system is essential for preserving the integrity of your home’s foundation, safeguarding against mold growth, and preventing water intrusion into the structure. By directing the flow of water effectively, these systems will also prevent soil erosion and landscape damage by avoiding flooding in garden beds and reducing moisture levels. This can protect the plants in your garden and prevent the growth of unwanted weeds around the house.

Attic

The attic is a space beneath the roof of a house or other building. It can be used as a small unusable space that’s insulated and ventilated or as a living area, like a bedroom or playroom. Some attics have a ladder for access, while others can be entered via a hatch or small door. The attic is an intermediary space between the roof and the ceiling of the uppermost floor of a house, and it’s crucial to home comfort, energy efficiency, and structural integrity.

Most Canadian homes have attics, and they usually feature open walls and a truss or rafters system. Rafters are triangular frames that support the roof, and they’re often built on-site. On the other hand, trusses are prefabricated and arrive at the construction site assembled.

Homeowners should perform routine maintenance on their roofs, including examining the attic and gutter system. They can also take on some roofing tasks themselves, especially if their home is no taller than two stories and they’re comfortable working from a ladder.

A qualified professional can perform more detailed inspections and repairs, and they can advise on the best course of action to address any issues that are discovered. In addition to examining the roof itself, they’ll check the insulation, ventilation, and air sealing. They’ll also look at ductwork, as well as any electrical wiring that runs through the attic.

The attic is one of the most vulnerable areas in a home, and a variety of problems can be caused by improper maintenance and design decisions. A roof leak, for example, can cause serious damage inside the home if not addressed quickly enough. Similarly, the attic’s insulation can deteriorate over time, leading to a lack of thermal resistance and a rise in energy costs.

Homeowners can prevent these problems by following some basic maintenance tips, such as avoiding storing items in the attic. This can overload joists and compress the insulation, while also creating a fire hazard. It’s also important to keep attic vents clear of obstructions, and homeowners should work in the attic during cooler parts of the day to avoid heat exhaustion. Regular attic inspections can help prevent these issues from escalating into major problems.

Pest Control Services

A pest-free home or business is something many people take for granted until unwanted visitors begin to appear. Whether it’s insects invading the kitchen, rodents hiding in walls, or other pests damaging property, these problems rarely resolve themselves without proper intervention. What may begin as a minor inconvenience can quickly develop into a full-scale infestation, leading to health concerns, structural damage, food contamination, and costly repairs. That is why professional pest control services remain an essential part of maintaining a clean, healthy, and comfortable environment.

pest control

Modern Pest Control Stuart services go far beyond simply eliminating visible pests. They focus on identifying the source of the problem, understanding pest behavior, and implementing customized treatment plans that provide lasting protection. Rather than relying on temporary fixes or repeated do-it-yourself methods, professional pest management combines inspection, prevention, treatment, and ongoing monitoring to keep properties protected throughout the year.

Whether you own a home, manage a commercial property, or oversee a rental building, understanding how pest control services work can help you make informed decisions when dealing with unwanted infestations.

Understanding the Purpose of Pest Control Services

Pest control services are designed to identify, eliminate, and prevent infestations caused by insects, rodents, and other unwanted pests. Every property presents unique challenges depending on its location, age, construction, surrounding landscape, and maintenance practices. For this reason, professional pest control is rarely a one-size-fits-all solution.

The primary objective is not only to remove existing pests but also to address the conditions that allowed them to enter and survive in the first place. Food availability, moisture, shelter, and accessible entry points all contribute to pest activity. By targeting these factors, pest control professionals help reduce the likelihood of future infestations while improving the overall health and safety of the property.

Instead of offering temporary relief, professional services aim to create long-term protection through careful planning and preventive maintenance.

Why Pest Problems Should Never Be Ignored

Many property owners postpone pest control because they believe the problem is minor or temporary. Unfortunately, pests reproduce quickly, and small infestations often grow unnoticed until significant damage has already occurred.

Some pests quietly destroy wood, insulation, and structural components over long periods. Others contaminate food, spread bacteria, trigger allergies, or damage electrical wiring by chewing through cables. Even pests that appear harmless can multiply rapidly, making elimination much more complicated if treatment is delayed.

Ignoring early warning signs frequently results in higher repair costs, larger infestations, and increased disruption to daily life. Taking action at the first sign of pest activity is almost always the most effective and economical approach.

Common Signs You May Need Pest Control Services

Many infestations begin silently, making early detection extremely important. While every pest behaves differently, several warning signs indicate professional assistance may be needed.

Some of the most common indicators include:

  1. Frequent sightings of insects or rodents inside the property.
  2. Droppings, urine stains, or unpleasant odors.
  3. Scratching, scurrying, or chewing sounds inside walls or ceilings.
  4. Damage to wood, insulation, furniture, or food packaging.
  5. Visible nests, burrows, or unusual insect activity.

Recognizing these signs early allows professionals to address infestations before they become more extensive and expensive to eliminate.

The Inspection Process

A thorough inspection is the foundation of every successful pest control service. Before recommending treatment, professionals carefully examine both the interior and exterior of the property to determine the type of pest involved, the severity of the infestation, and the factors contributing to the problem.

During the inspection, technicians typically evaluate kitchens, bathrooms, attics, crawl spaces, basements, garages, storage rooms, utility areas, roofing, foundations, landscaping, and other vulnerable locations where pests commonly hide.

This comprehensive assessment helps identify nesting sites, entry points, moisture issues, food sources, and structural vulnerabilities. Rather than treating symptoms alone, the inspection focuses on uncovering the root causes of pest activity.

Customized Treatment Plans

Every infestation requires a different approach. Modern pest control services create treatment plans based on the specific pest species, property layout, infestation level, and environmental conditions.

A customized plan may involve targeted applications, trapping systems, exclusion techniques, sanitation recommendations, moisture control, or habitat modification. The goal is to eliminate active pests while minimizing disruption to the property and reducing the likelihood of future infestations.

Because no two situations are identical, individualized treatment plans generally produce more reliable and longer-lasting results than generic, one-size-fits-all solutions.

Prevention Is a Key Part of Professional Pest Control

One of the greatest advantages of professional pest control services is their emphasis on prevention. Eliminating pests is only one part of the process. Preventing them from returning is equally important.

Preventive recommendations often include:

  1. Sealing cracks, gaps, and entry points.
  2. Repairing plumbing leaks and reducing excess moisture.
  3. Properly storing food and disposing of waste.
  4. Improving ventilation in damp areas.
  5. Maintaining landscaping to reduce pest harborage.

These proactive measures help create an environment that is far less attractive to pests while supporting the effectiveness of future treatments.

Safe and Targeted Pest Management

Modern pest control has evolved significantly over the years. Today’s professionals rely on careful inspections, targeted treatment methods, and responsible application practices rather than widespread or unnecessary product use.

By understanding pest behavior, technicians can focus treatments precisely where pests live, breed, and travel. This targeted approach increases effectiveness while minimizing unnecessary exposure throughout the property.

Professional services also stay informed about current industry standards and best practices, ensuring treatments are appropriate for the specific pest problem being addressed.

Residential Pest Control Services

Homes provide many of the resources pests need to survive, including warmth, food, water, and shelter. Residential pest control focuses on protecting families, pets, and personal property from infestations while helping maintain a comfortable living environment.

Services may include routine inspections, seasonal treatments, exclusion work, preventive maintenance, and recommendations for improving household sanitation and moisture control.

By identifying potential issues early, residential pest control helps homeowners avoid expensive repairs and recurring infestations.

Commercial Pest Control Services

Businesses face unique pest control challenges due to higher traffic, larger buildings, storage areas, food handling operations, and complex facility layouts.

A pest infestation in a commercial setting can damage inventory, interrupt operations, affect customer confidence, and create regulatory concerns depending on the industry.

Professional commercial pest control programs are typically customized to minimize business disruption while providing ongoing monitoring and preventive maintenance tailored to operational needs.

Regular inspections help businesses maintain cleaner, safer environments for employees and customers alike.

Seasonal Pest Activity

Pest behavior often changes throughout the year as weather conditions shift. During warmer months, many insects become more active, while colder seasons may encourage rodents and other pests to seek shelter indoors.

Professional pest control services understand these seasonal patterns and adjust treatment strategies accordingly. Preventive inspections before periods of increased pest activity often reduce the likelihood of infestations becoming established.

Seasonal maintenance also allows property owners to address structural issues, moisture problems, and landscaping concerns before they attract unwanted pests.

The Importance of Ongoing Monitoring

Many people mistakenly believe that a single treatment permanently solves every pest problem. In reality, long-term pest management requires ongoing monitoring and maintenance.

Professional follow-up visits allow technicians to evaluate treatment effectiveness, identify new activity, monitor vulnerable areas, and make adjustments if necessary.

Regular monitoring is particularly valuable for larger properties, commercial buildings, and locations with recurring pest pressure.

By maintaining a proactive approach, property owners reduce the risk of future infestations while protecting their investment over the long term.

Benefits of Hiring Professional Pest Control Services

Professional pest control offers advantages that extend far beyond simply removing visible pests. Experienced technicians bring specialized knowledge, advanced equipment, and proven treatment methods that are often difficult to replicate with over-the-counter products.

Some of the key benefits include:

  1. Accurate identification of pest species.
  2. Customized treatment strategies for specific infestations.
  3. Long-term prevention rather than temporary relief.
  4. Early detection of hidden pest activity.
  5. Reduced risk of property damage and recurring infestations.
  6. Professional guidance for maintaining a pest-resistant environment.

These benefits make professional pest control a valuable investment for homeowners and businesses seeking reliable, lasting protection.

Supporting Professional Pest Control with Everyday Habits

Even the most effective pest control program works best when combined with consistent property maintenance. Everyday habits play an important role in reducing the conditions that attract pests.

Simple practices such as cleaning food spills promptly, storing pantry items in sealed containers, removing standing water, repairing damaged screens, reducing clutter, and inspecting the property’s exterior regularly can significantly decrease pest activity.

These habits complement professional treatments by making the environment less suitable for pests to survive and reproduce.

Choosing the Right Time to Schedule Pest Control

Waiting until pests become highly visible often allows infestations to grow unnecessarily. Scheduling professional pest control at the first sign of activity can prevent minor problems from becoming major ones.

Preventive inspections are also beneficial even when no obvious infestation exists. Routine evaluations help identify hidden vulnerabilities before pests take advantage of them.

Whether addressing an active infestation or planning preventive maintenance, timely pest control services offer greater protection while reducing the likelihood of costly repairs in the future.

Pest control services play an essential role in protecting homes, businesses, and other properties from the many problems that pests can create. From safeguarding health and preventing structural damage to improving comfort and preserving valuable investments, professional pest management provides benefits that extend far beyond eliminating unwanted insects or rodents. Modern pest control combines detailed inspections, customized treatment plans, preventive strategies, and ongoing monitoring to deliver comprehensive, long-term solutions rather than temporary fixes.

The most effective approach to pest control is one that emphasizes prevention, early detection, and consistent maintenance. By addressing the underlying causes of infestations and partnering with experienced professionals when needed, property owners can enjoy greater peace of mind and a healthier, safer environment throughout the year. Investing in professional pest control services is not simply about responding to pest problems—it is about protecting the value, safety, and comfort of your property for years to come.

How to Turn Old Cabinets Into Statement Pieces With Refinishing

Cabinet Refinishing San Jose CA

Cabinet Refinishing San Jose CA is a cost-effective way to update your kitchen. It will transform your cabinets from builder-grade basic to a unique furniture piece that showcases your creativity.

Transform a cabinet into a stylish wardrobe by adding shelves and hooks, a coffee station with a built-in espresso machine, or a craft station with pegboards and organizers. The options are endless!

Paint

Cabinets are an integral part of a home’s interior design, and can help make a house feel more like a home. Whether you have outdated cabinets sitting in the garage or a vintage set from your childhood, refinishing them can transform them into unique furniture pieces and add a bold, eye-catching focal point to any room.

Whether you’re looking for an elegant white or modern navy, there are plenty of paint options that will breathe new life into your cabinets. When choosing a color for your cabinets, be sure to coordinate it with other elements in the room. This helps create a balanced, cohesive look that’s visually appealing and welcoming.

Before you start your project, it’s important to prepare the cabinets for painting. First, you will want to thoroughly clean them with a degreaser to eliminate grease and oil that naturally builds up on surfaces over time. Once the cabinets are clean, you will want to apply a primer to ensure the new paint will adhere well to the surface. We recommend using a quality primer, such as Extreme Bond Primer. This primer has outstanding adhesion and requires little to no sanding, making it a good option for most surfaces.

After the primer has fully dried, you’ll be ready to begin refinishing. If your cabinets were previously painted, you will need to remove the doors and hardware. This is the best way to get a clear view of what needs to be done. Make sure to mark where each item goes so you can reinstall it properly once the job is finished.

If your cabinets are in good shape, you may not need to sand down rough areas or repair damaged parts before applying a fresh coat of paint. However, if the existing finish is worn or cracked, you will need to strip it before you can proceed. There are many paint stripping products on the market that make this process easy and quick. When stripping, it’s important to follow the manufacturer’s instructions closely. Once you’ve sanded down any rough areas, cleaned them thoroughly and repaired any damages, you’ll be ready to give your cabinets a new lease on life.

Stain

Incorporating old cabinets into creative home decor is a great way to add style and personality to any room. Cabinets can be upcycled into stylish storage solutions by transforming them into pantries with shelves and organizational baskets, wardrobes by removing the doors and adding hooks or shelves for hanging clothes, shoe storage in a hallway, coffee stations by installing a built-in coffee maker with storage for mugs, craft stations by installing pegboards and organizers inside, or functional furniture pieces that reflect personal style like a bookshelf in the living room.

To create a bold statement, consider painting your cabinets a dramatic color that stands out against the existing wall and trim. While this requires more work and investment, it’s a great way to make the biggest impact with your renovation project. Depending on your taste and budget, you can opt for a glossy or matte finish. Both are popular options that give your space a sleek and modern look.

For a more subtle change, you can also stain your cabinets in a natural wood tone. Stains are pigmented and can transform your wood’s appearance, bringing out its natural grains and highlights. There are various types of stains available, including water based and oil based, so be sure to choose one that is appropriate for your project.

To prepare your cabinets for staining, start by sanding down rough areas and repairing any damaged parts of the cabinet. Once the surface is smooth, you can fill in cracks or holes with wood filler and clean thoroughly before sanding again. Then, apply a stain of your choice using the proper techniques to achieve a smooth and even result.

Lacquer

If you love the look of old cabinetry but don’t have the budget to replace them, you can give them a new lease on life with refinishing. Whether they’re in your kitchen or another room of the house, old cabinets can be transformed into stylish storage solutions, unique furniture pieces, and more. The key is to get creative and have some DIY fun. With the right tools, techniques, and creativity, you can upcycle your old cabinets into statement pieces that add personality to any space.

Cabinets can be repurposed as stylish storage solutions for the kitchen, laundry room, home office, or garage. By converting cabinets into pantries with shelves and baskets to organize utensils, installing hooks on the inside of cabinet doors to hang kitchen tools, or using them as a coffee station with a built-in coffee maker and storage for mugs, you can create a functional workstation that saves space.

Old cabinets can also be transformed into stylish wardrobes by removing doors and adding shelves or hooks to hang clothes. You can even turn a cabinet into a craft station by installing pegboards and organizers inside to keep all your crafting supplies in one place.

When upcycling old cabinets, it’s important to use quality paint and stain that will stand the test of time. High quality cabinet paint is available in a wide variety of finishes to suit your style, from glossy to matte. It’s also a good idea to choose a primer that is designed for cabinetry. For example, General Finishes produces a fast-drying lacquer primer that provides an excellent surface for painting over. It dries quickly and is easy to sand, providing a smooth finish for waterborne or oil based paints.

If you want to modernize your antique or vintage furniture, consider refinishing it with a bright or patterned lacquer. You can also use a darker stain to ground a room and make it feel more elegant or lighter to cheer up a north-facing room. Changing the color of a piece of furniture can also make it feel like a brand-new statement piece, whether you’re going bold with red lacquer or choosing something more conservative with a rich forest green.

Seal

Old cabinets that have been repurposed into creative home decor can bring a touch of personality to a space. From stylish storage solutions to unique furniture pieces, there are many ways to give a new life to these old cabinet doors.

Whether you’re looking to add a pop of color to your kitchen, or simply want to spruce up the look of your living room, the right finish can make all the difference. There are several techniques you can use to transform your cabinets, including painting, staining and lacquering. Using a combination of these finishes can help you achieve a sophisticated, timeless look that will last for years to come.

While it may seem like a daunting task, refinishing your cabinets is actually much easier than you might think. The key to successful refinishing is proper preparation. First, you will need to remove all of the cabinet doors and drawers, label them for easy reassembly later, and set up a staging area where you can work on each piece individually. Next, sand down any rough areas, repair any damaged parts, fill in cracks or holes with wood filler, clean thoroughly, and apply a fresh coat of paint or stain.

Once your new finish is dry, you can add a sealer to protect it from wear and tear over time. It’s also important to sand and re-stain your cabinets regularly to keep them in good condition. This will help the new finish last longer, and it will also help prevent scratches, dents and other damage over time.

Cabinets can be repurposed into stylish and functional storage solutions for any room in the house. You can turn them into a pantry with shelves and baskets for organizing food items, a closet to store clothes and accessories, or a craft station with pegboards and organizers to keep your supplies organized and in one place. If you have a children’s playroom, you can even use cabinet doors to create bookcases or toy storage.

For a more modern look, you can even install a chalkboard on a cabinet door to write shopping lists or recipes, which will add a fun element of functionality and style to your kitchen. Or, you can paint or decoupage a cabinet door and hang it on the wall as a decorative piece of art.

The Ultimate Spring Gutter Cleaning Checklist

Gutters Colorado Springs

Regular gutter cleaning is the unsung hero of home maintenance. This critical task protects your house from foundation damage, shingle damage, and structural issues.

Gutter systems channel gallons of water away from your foundation and walls to prevent water damage. But clogged gutters can cause leaks and other costly repairs.

1. Inspect Your Gutters

Gutters are designed to protect the foundation of your home from water damage. However, clogged gutters allow water to spill over the sides and enter your home. This water can cause mold, warped window frames, sagging walls and damp basements. A thorough gutter cleaning and inspection can prevent these problems and extend the life of your gutters.

Gutter inspections should be done at least twice a year, once in the spring and once in fall. This maintenance ensures the integrity of your gutter system and identifies any potential issues, such as leaks or loose attachments. Inspecting your gutters will also help you avoid costly repairs in the future.

A detailed inspection should look for any signs of wear or tear, as well as rust or loose screws. It should also check the downspouts for dents, cracks or clogs. If you notice any of these issues, they should be repaired or addressed immediately. Regular inspections can identify small problems, such as a leaking roof in Denver or sagging gutters, and prevent them from becoming serious problems that require expensive repairs.

During the inspection, it is important to note where the gutters are positioned on your house and whether they are properly sloped. If the gutters are not sloped correctly, they may overflow during rainstorms and cause water to flow into areas of your home that it shouldn’t, such as window sills, walls, basements or crawl spaces.

Before you start working on your gutters, make sure to have all the proper equipment. A leaf blower, wet/dry vac or garden hose with a pressure washer can all be used to clean your gutters. If using a pressure washer, be careful not to use too much water and direct the spray away from your windows and siding, which could damage them. Start by clearing one section of the gutter and work your way around the house. Remember to reposition the ladder as needed and be careful not to overextend yourself, which can lead to injuries.

Once the main debris has been removed from your gutters, it is time to inspect your downspouts for clogs or other issues. A downspout that is clogged can cause water to overflow the gutter system and create an environment that can promote mold, rot and insect infestations.

2. Remove Debris

Gutters are a key part of your home’s defense against water damage. However, over time gutters can become clogged with leaves, twigs, debris and other contaminants. When this happens, rainwater is forced over the sides of your gutter system or into your home, potentially causing water leaks, foundation damage, mold and mildew, and landscaping washout. Regular cleaning and maintenance can help prevent these issues and save you time and money in the long run.

Clogged gutters are also a breeding ground for pests and rodents. When insects and critters nest in dirty, overflowing gutters, they can eventually find their way inside your house and cause damage to your furniture, walls, ceilings, and floors. Gutters that are regularly cleaned and protected by solutions like LeafFilter Gutter Guards can help prevent these problems and keep your home safe from pests.

During your spring cleaning session, begin by removing all the debris from the gutters. This may require a ladder, work gloves, garden trowel, and a bucket or bag to collect the materials as you go. If you’re struggling to remove packed-in or caked-on material, you can try using a hose with a gutter cleaning attachment. Be sure to carefully position your hose so that the spray is directed away from fascia, siding, and roofing.

You’ll want to clear your downspouts as well, which are crucial to ensuring that rainwater is properly directed away from your home. Use a garden hose with a nozzle attachment to flush out downspouts and remove any debris that is ledged in the gutter system. Make sure to check and replace downspout strainers as needed. It’s also a good idea to schedule mid-summer and late fall gutter cleaning sessions, which will address debris accumulation from summer storms and weed growth, respectively.

3. Clean Your Downspouts

Clogged gutters don’t just look bad; they prevent rainwater from draining properly and can cause water damage to fascia, soffit, and the roof. The best way to avoid costly problems is to maintain a functioning gutter system through regular cleaning and inspections.

In addition to removing leaves and debris, a downspout cleanout is a good time to flush out the downspout and check for leaks or other problems that need repair. If your downspout is clogged, first try using a garden hose with a narrow spraying attachment to dislodge the blockage. If this doesn’t work, cover the opening of the downspout with a bucket and use a hand auger (also known as a plumber’s snake) to clear out the clog. Be sure to wear gloves and eye protection when working with a hand auger.

Once you have the downspout free, rinse it with a hose to make sure the water flows freely through to the ground below. Also, take this opportunity to examine the gutter system and replace any damaged or missing downspout hangers or connectors.

Finally, inspect the tree limbs surrounding your home to make sure they aren’t touching your gutters or too close, which could cause damage in a storm. If a tree limb needs to be cut back, contact a professional to have the job done safely.

Gutter cleaning isn’t a fun or easy chore, but it’s important to keep up with so you can avoid expensive repair and maintenance costs. For a fast, efficient and safe gutter cleaning solution, call Mr. Handyman today to schedule a local technician near you! Our experts have an average of 10 years of experience and the Done Right Promise. We’ll give your home a quick, comprehensive inspection and provide an estimate before beginning the work. We’ll also offer you tips on how to prevent future clogs and other maintenance issues.

4. Rinse Your Gutters

Gutters whisk away thousands of gallons of water every day, directing it from your home to prevent foundation damage and landscape erosion. However, if they become clogged with leaves, debris, and gunk, it has nowhere to go; instead, it collects around the home and seeps into the exterior and interior of your house, damaging the fascia boards, roof, siding, and more. To keep your gutters working properly and your home safe, you need to take care of them by cleaning and inspecting them regularly.

A good time to start is during the spring, before summer storms deposit additional debris and clog existing sagging sections of the gutter system. You also want to look for warning signs of trouble, like visible plant growth, sagging gutters, and water or staining along the siding or foundation. These problems can result in serious structural damage, so it’s important to catch them early.

Rinsing your gutters is an essential part of spring cleaning that can save you a lot of time and money in the long run. Using a pressure washer or garden hose with a nozzle attachment, rinse the gutters to remove any remaining debris and wash away the gunk from accumulated ice and salt deposits that can cause corrosion over time. After rinsing your gutters, use a ladder to inspect them for any dents, holes, or broken components and make repairs as needed.

Regular gutter cleaning can protect your home from costly repairs and improve its curb appeal. However, if you find the job intimidating or your gutters are located high up on your home, consider hiring a professional service to take care of it for you. Professional services will also perform inspections and recommend any necessary maintenance to help you avoid costly repair bills in the future. And, if you’re looking for an easy way to minimize the need for manual maintenance, consider installing gutter guards that filter out debris and promote proper water flow all year round!

Navigation